Showing posts with label eclipse. Show all posts

June 25, 2008

Create new eclipse workspace -- with all your old settings

It's all a matter of taste. Do you like to have just one workspace for all your projects, or do you prefer to have multiple separate workspaces?

Sure, the first way seems to be the official, supported. It should be easy to manage the workspace -- given the tools like working sets (and working set filters), mylyn and the ability to close projects.

But I still don't get it.

I hate when my workspace is overflowing with projects, I want to have as many workspaces as projects.

So I create new workspace and live happily ever after.

But wait -- all my settings are gone. All my carefully crafted custom templates, all my keybindings, my font settings, everything is gone.

It's all text, fortunately


Lucky us. All eclipse settings are saved as a plain text in the workspace directory. So if you want to create new workspace, but preserve your settings, I have two answers for you:

The short answer

All settings are stored in the .metadata/.plugins/org.eclipse.core.runtime/.settings directory. I mean -- all relevant settings. If you look into .metadata/.plugins directory there are many more directories with settings, but they are too project specific. I've walked trough these configuration files one by one, believe me, nothing useful lies hidden there.

So the short answer is: If you want to create a new eclipse workspace and preserve all your settings, simply copy the .metadata/.plugins/org.eclipse.core.runtime/.settings directory into your new workspace directory.

The long answer

Let the code do the talk for me.
I have created a (simple) shell script that automates new workspace creation. The downside is that it requires either *nix or windows with cygwin. It has been tested by me, I and myself so it should work (most of the time).

To use it, save it somewhere, make it executable (chmod +x new-workspace.sh) and run it either in interactive mode
./new-workspace.sh -i
where it will ask you the details, or with paths to your workspaces (the new workspace directory will be created for you, just specify the path)
./new-workspace.sh old-workspace new-workspace.
If the script doesn't work for you, drop me a comment. Feel free to improve it (you may drop me a comment too).

Update: the pastebin page expired (although I'd swear I checked the keep forever option), so I moved the script over to github.


February 28, 2008

Effective Eclipse V: Template mix

The same way I try to avoid the redundancy in my code, the same way I try to avoid the redundancy in my writing. I am lazy and templates do the most writing for me. Eclipse comes bundled with predefined templates, but they are too general and not all of them are too useful. The real power is in custom templates. In this article I would like to show you how to create them and list few useful pieces for inspiration.

What are templates


Exactly as the name suggests, templates are little pieces of code with defined placeholders. An example of simple template is
System.out.println(${text});
Each template has a name, which serves as a shortcut to the template itself. You type the name, press CTRL + SPACE and it will be expanded.

Our first template would expand to

I will not explain here what it all means, I already did this in my previous post on templates. What is important now, is that the ${text} placeholder (variable) was highlighted and can be edited immediately.

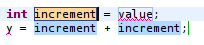
The true power of templates can be fully seen in more complex templates. The first power point lies in the fact, that you can have more than one variable with same name. Our second template will have more variables:
int ${increment} = ${value};
y = ${increment} + ${increment};
and will expand to
When you start typing now, all occurrences of increment variable will be changed. You can then switch to the next variable by pressing TAB key. In the end, you can have

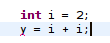
in just three key presses - one for i, one for TAB and one for 2.

To make it even better, the template system provides predefined variables, which will be expanded depending on their context. I will not list them, you can find them under the Insert variable button.

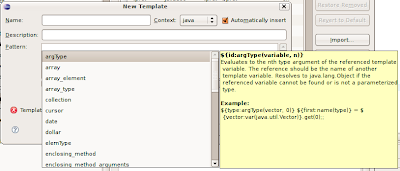
Notice, that you are not getting only a list, you are also getting a description and an usage example.

To make it clear, I will illustrate one builtin variable - ${enclosing_type}. When this one is expanded you will get a name of the class (or interface, enum) in which your template was expanded.

"But how can I use it?", I hear you asking. I have prepared few templates just for inspiration, I believe that after reading this you will find thousands others and I believe that you will create them and share them with us.

Custom templates


Open Window -> Preferences and type Templates into the search box.


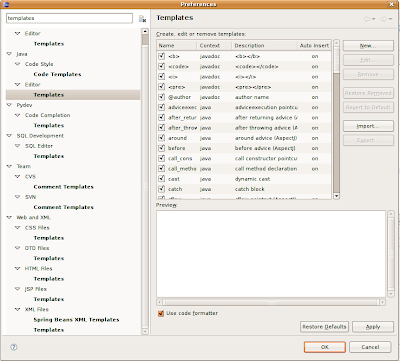
You will get a list of all editors, and their respective template settings. This is because templates are closely bound to editors - you will get different builtin variables in different editors. Also note, that your list may vary from my list, it all depends on installed plugins.

Now you must decide what type of template you would like to create. If it is a Java template, which will be applicable in context of classes, interfaces and enums, then choose Java -> Editor -> Templates. If you create a Java template you won't be able to use it in XML editor, that's quite expected.

So click on the New button, to get a dialog. Here it is, in all its glory:
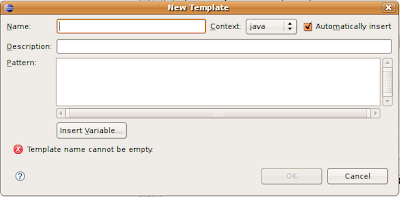
Name is the name of the template. Choose it well, because it will serve as a shortcut to your template. After you type the name of the template (or at least a few characters from its name) and hit CTRL+SPACE it will be expanded.

Description is what you will see next to the template name when the template name is ambiguous.

Pattern is the template body. And the Context? This varies in every editor. If you look in the combobox in Java templates, you will see Java and Javadoc. It is simple a context within the respective editor in which the template would be applicable.
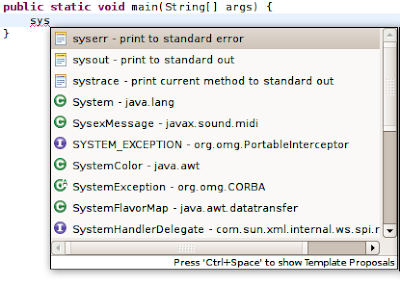
Check Automatically insert if you want the template to expand automatically on ctrl-space when there is no other matching template available. It is usually good idea to leave the checkbox checked, otherwise you would get a template proposal "popup". See what happens when I uncheck it on sysout template.

If I would have checked it, it would automatically expand, as there is no other template matching sysout* pattern.

My list


So here is the list I promised. I have categorized it.

Java (Java->Editor->Templates)
  • logger - create new Logger
    private static final Logger logger = Logger.getLogger(${enclosing_type}.class.getName());
    Notice the usage of ${enclosing_type} variable. This way you can create a logger in few hits. After the template expands, you will probably get red lines, indicating that Logger clas could not be found. Just hit CTRL + SHIFT + O to invoke the organize imports function. You are using shortcuts, aren't you?

  • loglevel - log with specified level
    if(${logger:var(java.util.logging.Logger)}.isLoggable(Level.${LEVEL})) {
    ${logger:var(java.util.logging.Logger)}.${level}(${});
    }
    ${cursor}
    Let me explain the details. ${logger:var(java.util.logging.Logger)} uses a builtin "var" variable. It starts with logger, the default name, in case the var variable finds no match. It is then followed by var(java.util.logging.Logger), what will evaluate to the name of the variable (member or local) of the specified type (in our case of the Logger type). Further, the ${cursor} variable marks the place where the cursor will jump after you press enter. So the result after expanding could be

    You might wonder what is the purpose of the if. It is there only for performance gain. If specified level is not allowed the logging method will never be called and we can spare JVM some string manipulation to build the message.

  • readfile - read text from file

    Never can remember how to open that pesky file and read from it? Nor can I, so I have a template for it.

    BufferedReader in;
    try {
    in = new BufferedReader(new FileReader(${file_name}));
    String str;
    while ((str = in.readLine()) != null) {
    ${process}
    }
    } catch (IOException e) {
    ${handle}
    } finally {
    in.close();
    }
    ${cursor}
Maven (Web and XML -> XML Files -> Templates)
  • dependency - maven dependency
    <dependency>
    <groupId>${groupId}</groupId>
    <artifactId>${artifactId}</artifactId>
    <version>${version}</version>
    </dependency>
    ${cursor}
  • parent - maven parent project definition
    <parent>
    <artifactId>${artifactId}</artifactId>
    <groupId>${groupId}</groupId>
    <version>${version}</version>
    <relativePath>{$path}/pom.xml</relativePath>
    </parent>
    ${cursor}
web.xml (Web and XML -> XML Files -> Templates)
  • servlet - new servlet definition
    <servlet>
    <servlet-name>${servlet_name}</servlet-name>
    <servlet-class>${servlet_class}</servlet-class>
    <load-on-startup>${0}</load-on-startup>
    </servlet>

    <servlet-mapping>
    <servlet-name>${servlet_name}</servlet-name>
    <url-pattern>*.html</url-pattern>
    </servlet-mapping>
    ${cursor}
JSP pages (Web and XML -> JSP Files -> Templates)
  • spring-text - spring text field with label and error
    <label for="${path}" class="${label_class}"><fmt:message key="${path}"/></label>
    <spring:input path="${path}" cssClass="${input_class}"/>
    <spring:errors path="${path}"/> <br/>
    ${cursor}
  • spring-checkbox
    <label for="${path}" class="${label_class}"><fmt:message key="${path}"/></label>
    <spring:checkbox path="${path}" cssClass="${input_class}"/> <br/>
    ${cursor}
  • spring-select
    <label for="${path}" class="${label_class}"><fmt:message key="${path}"/></label>
    <spring:select path="${path}" cssClass="${input_class}">
    <spring:options items="${items}" itemLabel="${label}" itemValue="${value}"/>
    </spring:select>
    <spring:errors path="${path}"/> <br/>
    ${cursor}
  • spring-generic
    <label for="${path}" class="${label_class}"><fmt:message key="${path}"/></label>
    <spring:${type} path="${path}" cssClass="${input_class}"/>
    <spring:errors path="${path}"/> <br/>
    ${cursor}
    These are my favorites. They regularly save me a huge amount of time. Creating spring forms has never been easier for me.
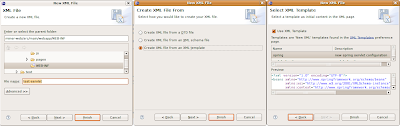
In some editor types you can set the template to 'new', for example, in XML editor it is new XML. This is really useful, as you can prepare the skeleton of a new file. For example, this is what I use to create new Spring servlet configuration for freemarker application.
<?xml version="1.0" encoding="UTF-8"?>
<beans xmlns="http://www.springframework.org/schema/beans"
xmlns:xsi="http://www.w3.org/2001/XMLSchema-instance"
xmlns:context="http://www.springframework.org/schema/context"
xsi:schemaLocation="http://www.springframework.org/schema/beans
http://www.springframework.org/schema/beans/spring-beans-2.5.xsd
http://www.springframework.org/schema/context
http://www.springframework.org/schema/context/spring-context-2.5.xsd">

<context:component-scan base-package="" />

<bean id="freemarkerConfig" class="org.springframework.web.servlet.view.freemarker.FreeMarkerConfigurer">
<property name="templateLoaderPath" value="/"/>
</bean>

<bean id="viewResolver" class="org.springframework.web.servlet.view.freemarker.FreeMarkerViewResolver">
<property name="viewClass" value="org.springframework.web.servlet.view.freemarker.FreeMarkerView"/>
<property name="exposeSpringMacroHelpers"><value>true</value></property>
<property name="cache" value="true"/>
<property name="prefix" value="/pages/"/>
<property name="suffix" value=".ftl"/>
</bean>

<bean id="messageSource" class="org.springframework.context.support.ResourceBundleMessageSource">
<property name="basename"><value>messages</value></property>
</bean>
</beans>
Now, I can create new XML file from template and it will be ready to use. Before I knew about templates, I used to copy this from an older project, or search for it in Spring documentation. Now I don't have to..

If you can overcome the initial laziness and create your own templates from the pieces of code you really use, than this investment will shortly return in form of less typing. If you have some interesting templates, please, share them with us.

You can download the templates mentioned in this post and import them using the Import button in the editor template settings.


February 9, 2008

Add jQuery autocompletion to your Eclipse

It's easy with jQueryWTP. It is not an Eclipse plugin, it is a nice tool, which modifies some WTP plugin autocompletion definitions to make it support jQuery.

Installation is easy:

  • run the tool
  • find the plugin jar and patch it
The complete instructions with a video guide are available on the jqueryWTP homepage.

It works nicely, there is one gotcha however, which is not mentioned in the official instructions. You must choose the correct jar, the one, which is being used by WTP. It is possible to have multiple version of the same plugin jar - it is even anticipated if you update your plugins. So choose the correct version - it should be the most recent, with the highest version number. If you are unsure, try all of them, but don't forget to do a backup of the original plugin jar.

It can spare you few key strokes and eventually few trips to visualjquery.


February 3, 2008

Effective Eclipse IV: Fix it, quickly

You are in trouble. Red lines are everywhere. There is no easy way out, so you just either start googling what went wrong, or start a copy&pasting session. If it is so smart, it can tell me that I have an error in my code, why cannot it just fix it?

Well, let me introduce you a powerful ally: Quick Fix.

A small example

On the image above is a well-known situation. The method is throwing a checked exception, so the calling method must either enclose it in a try-catch block, or rethrow it. A typical solution to this problem is to manually write the try-catch block or throws clause. But there is a better way, the way of quick fix.

It can be invoked in two ways

  • clicking on the bulb, left of the line number
  • hitting CTRL + 1 - the preffered way
The result will be..

..that quick fix will propose you both fixes. In the yellow box is a preview, it looks messy, but the code will be properly formatted. If you don't like the generated code, you can change it under Window->Preferences->Java->Code Style->Code Templates. I don't like the default e.printStackTrace(), so I changed the Catch block body template to
logger.severe("Exception caught: " + ${exception_var});
Whenever a red line appears, quick fix can eliminate it. It is applicable not only to the situation above, it can fix:
  • Typos
  • Imports
  • Casting

    Starting with the simple casts...


    .. to even more intricate

  • and any other kind of problem I am unable to think up at the moment.
I found quick fix helpful even in the desperate situations like this one:


Project needs to migrate WTP metadata? Ok then, have your fun.


When there is nothing to fix, quick fix turns itself to a quick refactoring. Let's see what will it propose on our list.


See, it provides all sorts of context sensitive advices. Refactoring, renaming, annotations, everything is there, hidden under one shortcut key. A powerful shortcut key, definitely.


October 16, 2007

Effective Eclipse: III. Don't write the code, generate it


I hope that we will never be able to generate applications. I would be without job then and you probably too. But what we can generate are various repetitive and boring pieces of code.


The first thing that can be generated is class file. You are using it, but you have probably never realized how much time did it save you. If there was no class skeleton generation, you would have to: create new file in the proper directory (with respect to package (and create the folders too)) and place the package statement at the beginning of a class.
I noticed that all people generate their classes, but not all of them specify implemented interfaces and extended class. Surely, you can generate the class and write the extends and implements part afterwards, but it involves moving the cursor, writing and eventually generating abstract or implemented methods. I found it much easier to press ALT + E (extend) to add extended class and ALT + A (add interface) to add interfaces.


I you look at the Source menu you can find more "Generate" commands. But none of them is so valuable and useful as the Eclipse templates. They are the true gem in my daily work and its pity they are hidden out of sight. And they are hidden well.


What are they and how to get them?

Templates serve as a shorthand for a snippet of code. You type the magical word and it will be transformed into the snippet.

Some examples:

Type sysout and press CTRL + SPACE (the autocompletion, in case you didn't know) and it will be automagically changed to System.out.println(); with the caret waiting right in the middle between the parenthesizes.


While we are here, let's explore the next interesting feature. Type "for" and press CTRL + SPACE to change it to a skeleton of a for loop.


Notice the blue boxes around some of the commands. They represent the caret stop and you can move between them using the TAB key. Now, with the caret on "iterator", type the name of the variable representing the iterator. It's name will be changed in the whole loop as you type (the occurrences are marked with a light blue background). Now just two more TABs to change the collection variable and the type. Noticed the green line sitting in the empty line? It marks the position where the caret will jump when Enter key is pressed. So after changing the variable type you can just press Enter and the caret will jump to the empty line. Notice, that when you use autocompletion the green marker is always there, waiting for you to press Enter.


The templates are defined under: Window -> Preferences -> Java -> Editor -> Templates
where you can define your own templates.


That pesky CTL + SPACE shortcut offers some more surprises. If you get used to it, you will be hitting it often, even in situations where there is nothing to autocomplete. Or is it?


Guess what is on the picture above? It is eclipse trying to autocomplete the name of a variable.

It is pity it cannot read my mind. I often find myself hitting the shortcut in the middle of the string ever wondering why it doesn't complete the word :)


Never can remember the signature of a method you want to override? Never mind, hit CTRL + SPACE and you will get a list.


Effective Eclipse: II. Shortcut keys

Use your hands to write code


You should try to keep your hands on keyboard. The less you touch the mouse, the more code you can write. I am trying to keep the mouse laying still and control the IDE completely using keyboard. What do you think is faster: pressing ALT + C or right clicking the project, selecting Team -> Commit?

It is said, that if a function does not have a key binding, it is useless. Below you will find a set of essential keyboard shortcuts that I love. These shortcuts are set up by default, they should all work.

CTRL + D

Delete row. Try it! You no more need to grab the mouse and select the line, no more Home, Shift + End, Delete. Quick and clean.

ALT + Up/Down Arrow

Move the row (or the entire selection) up or down. Very useful when rearranging code. You can even select more rows and move them all. Notice, that it will be always correctly indented.


ALT + Left/Right Arrow

Move to the last location you edited. Imagine you just created a class Foo, and now you are working on a class Boo. Now, if you need to look at the Foo class, just press Alt+Left Arrow. Alt+Right Arrow brings you back to Boo.

CTRL+SHIFT+O

Organize imports. What happens when you first use a class you have not yet imported? You will see an error. But when you press this magical combination, all your missing classes will be imported, and the unused imports will vanish.

CTRL+1

Probably the most useful one. It activates the quick fix. Imagine you create a class, which implements some interface. You will get an error, because the inherited methods are not yet implemented. While you are on line where the error occurs, press this combination to activate the quick fix. Now, select the "Add unimplemented methods" option. You can use the quick fix at every error you ever receive.

Quick fix comes handy in other situations too. My favorite is the "Split variable declaration". Sometimes I need to broaden the scope of a variable. I activate the quick fix, split declaration, and use alt + arrow to put it where it belongs. You can find even more usages: Convert local variable to field, rename in file, Inline local variable..


You could use the "Split variable declaration" on the bar variable, and then move it with Alt+Arrows above the try block..


Or you could use the "Add unimplemented methods" fix here.

The best thing you can do if you see an error is to use the quick fix.

CTRL+SHIFT+T

Open Type. Imagine, that you need to have a look at the Foo class. But, where is the Foo class? Is it in the Boo project and in the foo.bar package? Or somewhere else? With this shortcut, you don't need to know. Just press it, type Foo and you are in.


CTRL+E

Shows you a list of all open editors.


CTRL+F6

Use to move between open editors. This is an slower alternative to Ctrl + E. Comes handy in a situation when you want to periodically switch between two editors, something, what is nearly impossible with Ctrl+E as it sorts entries quite randomly. Or you might just use Alt+Arrows..

CTRL+F7

Move between views. When in editor, press Ctrl+F7 to switch to the Package Explorer, or hold Ctrl and press F7 multiple times to switch to other views.

CTRL+F8

Move between perspectives. The same as previous.

CTRL + F11

Runs the application. What gets launched depends on your settings. It will either launch the last launched class (my preffered way) or it will launch currently selected resource (the default way). If you want to change its behavior read the previous post.

CTL + N

Open new type wizard. This is not very quick because you have to select the wizard type (weather you want to create new class, jsp, xml or something else) in the next step. Much faster way would be if you could just hit the shortcut and invoke the particular wizard. It is possible, just keep reading..

CTRL + M

Maximize or umaximize current tab.

CTRL + I

Corrects indentation.

CTRL + SHIFT + F

Formats code. You can make a beautiful looking code out of a mess with this. It requires a bit of setup, but it is well worth it. You can find its settings under Window->Preferences->Java->Code style->Formatter

CTRL + J

Incremental search. Similar to the search in firefox. It shows you results as you type. Don't be surprised, if you hit this combination, nothing happens - at the first glance. Just start typing and eclipse will move your cursor to the first ocurence.

CTRL + SHIFT + L

Shows you a list of your currently defined shortcut keys.

I don't like your shortcuts

Such is life nowadays. Remember, you can always change those bindings to match your preferences. Open Windows->Preferences->General->Keys. Now you can use the filter to find your shortcut and change its binding.

The real fun begins when you cannot find the command you are looking for. The key here, is to have the "Include unbounds commands" checkbox checked. It will show you all commands, even those, which have no keys bound.


While you are here, I recommend to add the following bindings:

CTRL+SHIFT+G

Bind this to "Generate getters and setters". This is a "must have".

ALT+C

Bind this to SVN/CVS "Commit".

ALT+U

Bind this to SVN/CVS "Update".
Now, type "new" (without quotes) in the filter text. You should see a list of all new type wizards. Choose the most frequently used and assign them a shortcut. For example, the most used wizard for me is the new class wizard. Thus I assigned it the CTRL+SHIFT+N keys.


Let me demonstrate a quick way to create new class now.

Hit CTRL + SHIFT + N (or the combination you assigned in the previous step). This should bring up new class wizard. Type in the name and press ALT+E. You can now select a class which will be a superclass for the newly created class. Hit ALT+A and select all implemented interfaces . Now hit ALT+F and your class will be generated. Eclipse will also provide the default implementation for all abstract and interface methods you inherited.

Did you notice the weird underscores everywhere in the dialog? They give you a hint about the shortcut key. Hit ALT and the underlined letter to press the button, check the checkbox or get focus for a textfield.


Did you notice the underscores?

I think that using shortcut keys is the fastest way to productivity and if not, then at least your wrists will say you a silent thanks. Now, don't wait, go on and assign keys to the features you use most.

One final tip from Andriy:

The problem is that there are so many keyboard shortcuts. I used to keep a printout with all the shortcuts I wanted to use. Finally I wrote an Eclipse plugin MouseFeed, which reminds the keyboard shortcuts for the actions called with mouse. You can even tell it to enforce some shortcuts - the action will run only if called with a keyboard shortcut.

So if you are struggling with yourself, if you want to use shortcuts, but always subconsciously touch the mouse, install the plugin and let it enforce the shortcuts - the mouse will be useless and you will be forced to use keyboard.

What shortcuts do you use?


October 15, 2007

Effective Eclipse: I. Setup

Today, I was taught an important lesson. The lesson of effectivity. I was attending a presentation, called "Python Django: Advanced web application in 40 minutes". The guy was a geek, he was writing the code in a very basic vim installation. I bet, that if he used something better (no offense, it was really basic installation and he was apparently no vim master) he could crack it in half the time. It was an "oh, I made a typo here" presentation. It was then, when I realized that you really need a good editor if you want to be productive.

Choose your tool

Just do it. Find what suits you best and use it. I found Eclipse. If you found something else, then I am sorry, but you probably wouldn't be interested in the rest of the article.

Know your tool

Basic setup

The first thing you should do, is to set up your font. If you are using Windows, you are lucky, as the font looks probably good and is well readable. If you are using Ubuntu like me, you might have less luck. When I first started eclipse, I was stunned. The font was big and crappy.
But not for too long.
Open: Window->Preferences->General->Appe
arance->Color and Fonts->Basic->Text Font and change the font size to 8. Much better now.
The font used is called Monospace, some people recommend Bitstream Vera Sans Mono. This is how it looked before and how it looks now.

Before:


After:


I recommend lowering the font size for your whole desktop. You will be surprised how much more can you see now. You can improve the font rendering too.

Don't be greedy

Eclipse is running with very small memory by default, but there is really no reason to be greedy. Just give your toy what it needs. Fire up the text editor, open eclipse.ini and enter:
-vmargs -Xms512M -Xmx1024M -XX:PermSize=128M -XX:MaxPermSize=256M
The -Xms option specifies the minimum and -Xmx the maximum heap size. The same holds for PermSize and MaxPermSize. Heap is that part of memory, where all your objects live. PermGen means "Permanent Generation" and it is a part of memory where all permanent objects are stored. By permanent, I mean those, which are not going to be garbage collected (for example Strings, classes etc.). Here you can find a better explanation of what PermGen is.
If you are running a linux box, you might experience OutOfMemoryError-s if you do not adjust memory
size. The values provided above are only for example, you should enter the values appropriate to your RAM size.

You can further tune the performance by providing additional arguments. In his article, Jim Bethancourt recommends using Throughput garbage collector (-XX:+UseParallelGC), Robi Sen recommends using CMS Collector (-XX:+UseConcMarkSweepGC) as more effective.

Help, I am giving the crap all my memory and it still keeps OutOfMemoryErroring!

The reason is that you are simply not giving it enough memory. But don't worry, you don't have to buy another memory module (well, unless you have 128MB RAM). It is possible that you have made a typo in eclipse.ini, or maybe you used wrong eclipse.ini or maybe it simply doesn't work. I cannot tell you how to fix it, but I can tell how much memory are you giving it.

Open Window->Preferences->General and check the "Show heap status" checkbox. You should now see the memory status in the bottom right corner.


If you see values which correspond to the values you entered, everything should be fine.

Set it up

You should really take a time to walk through all the options under Window -> Preferences and customize your eclipse installation. I am going to list few basic useful settings.

General

Always run in background: when eclipse is doing something time consuming it will bother you with a modal popup window showing you the progress of the task. I used to dismiss the popup with "run in background" button. I am usually not interested in watching the lazy progressbar. If you enable this option eclipse will no longer bother you, and all tasks will run in background by default. There is nothing worse than breaking your workflow with messages: Hey I am building, can you see?

Appearance: You can set various font related options here. If you are interested, you can change the position of tabs from top to bottom.

Editors->File associations: if you have some exotic extension you can map it to the appropriate editor here. If you have xml file called myfile.exotic you can map .exotic extension to the xml editor.

Editors->Text Editors -> Show line numbers: If you like, you can see line numbers. Very useful.

Editors->Text Editors -> Spelling: Eclipse comes bundled with a spell checking turned on by default. This is a good idea and I really liked it, until I opened localized messages for my web application. Every word in my file was marked as misspelled, I was looking at an yellow sea of warnings, editor became quickly unresponsive as it wasn't able to handle hundreds of spelling errors. I had to turn this feature off, at least until some kind of ignore list is implemented or some good folk creates dictionary for my language.

Java

Java->Code style: Under Cleanup and Formatter are code formatting settings which are applied everytime the file is saved. If you tune it, it is really a lifesaver.

Java->Code style->Code templates: Here you can find and edit various templates. The only thing I do here is changing the "new Type" template to show my real name as author instead of my operating system username.

Run/Debug

Run/Debug->Launching: In previous Eclipse releases if you hit the run button, the last launched application was started. In Eclipse 3.3 this behavior changed a bit, and the selected resource gets launched. I found it annoying as I usually have only one runnable class. You can switch to the old style by choosing the right option under Launch Operation fieldset.

I know I am repeating myself, but it is essential that you walk through the options and set it, such that it works with you, not against you.