The same way I try to avoid the redundancy in my code, the same way I try to avoid the redundancy in my writing. I am lazy and templates do the most writing for me. Eclipse comes bundled with predefined templates, but they are too general and not all of them are too useful. The real power is in custom templates. In this article I would like to show you how to create them and list few useful pieces for inspiration.
What are templates
Exactly as the name suggests, templates are little pieces of code with defined placeholders. An example of simple template is
System.out.println(${text});
Each template has a name, which serves as a shortcut to the template itself. You type the name, press
CTRL + SPACE and it will be expanded.
Our first template would expand to

I will not explain here what it all means, I already did this in
my previous post on templates. What is important now, is that the ${text} placeholder (variable) was highlighted and can be edited immediately.
The true power of templates can be fully seen in more complex templates. The first power point lies in the fact, that you can have more than one variable with same name. Our second template will have more variables:
int ${increment} = ${value};
y = ${increment} + ${increment};
and will expand to
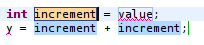
When you start typing now, all occurrences of
increment variable will be changed. You can then switch to the next variable by pressing
TAB key. In the end, you can have
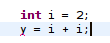
in just three key presses - one for
i, one for
TAB and one for
2.
To make it even better, the template system provides predefined variables, which will be expanded depending on their context. I will not list them, you can find them under the
Insert variable button.
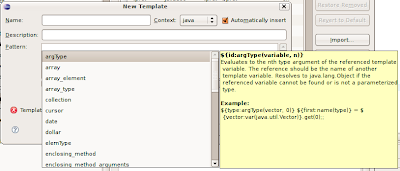
Notice, that you are not getting only a list, you are also getting a description and an usage example.
To make it clear, I will illustrate one builtin variable - ${enclosing_type}. When this one is expanded you will get a name of the class (or interface, enum) in which your template was expanded.
"But how can I use it?", I hear you asking. I have prepared few templates just for inspiration, I believe that after reading this you will find thousands others and I believe that you will create them and share them with us.
Custom templates
Open
Window -> Preferences and type
Templates into the search box.
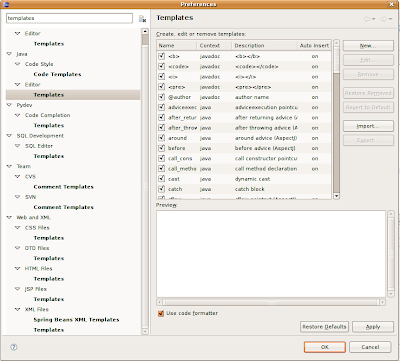
You will get a list of all editors, and their respective template settings. This is because templates are closely bound to editors - you will get different builtin variables in different editors. Also note, that your list may vary from my list, it all depends on installed plugins.
Now you must decide what type of template you would like to create. If it is a Java template, which will be applicable in context of classes, interfaces and enums, then choose
Java -> Editor -> Templates. If you create a Java template you won't be able to use it in XML editor, that's quite expected.
So click on the
New button, to get a dialog. Here it is, in all its glory:
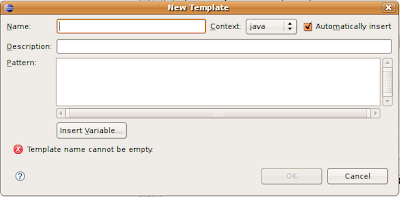 Name
Name is the name of the template. Choose it well, because it will serve as a shortcut to your template. After you type the name of the template (or at least a few characters from its name) and hit
CTRL+SPACE it will be expanded.
Description is what you will see next to the template name when the template name is ambiguous.
 Pattern
 is the template body. And the
Context? This varies in every editor. If you look in the combobox in Java templates, you will see
Java and
Javadoc. It is simple a context within the respective editor in which the template would be applicable.
Check
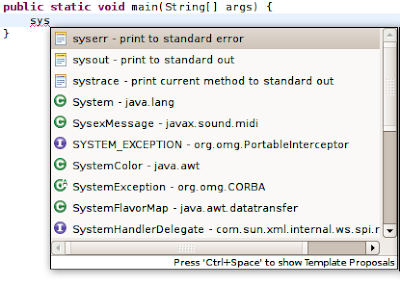
Automatically insert if you want the template to expand automatically on ctrl-space when there is no other matching template available. It is usually good idea to leave the checkbox checked, otherwise you would get a template proposal "popup". See what happens when I uncheck it on
sysout template.

If I would have checked it, it would automatically expand, as there is no other template matching
sysout* pattern.
My list
So here is the list I promised. I have categorized it.
Java (Java->Editor->Templates)
- logger - create new Logger
private static final Logger logger = Logger.getLogger(${enclosing_type}.class.getName());Notice the usage of ${enclosing_type} variable. This way you can create a logger in few hits. After the template expands, you will probably get red lines, indicating that Logger clas could not be found. Just hit CTRL + SHIFT + O to invoke the organize imports function. You are using shortcuts, aren't you?
- loglevel - log with specified level
if(${logger:var(java.util.logging.Logger)}.isLoggable(Level.${LEVEL})) {
${logger:var(java.util.logging.Logger)}.${level}(${});
}
${cursor}
Let me explain the details. ${logger:var(java.util.logging.Logger)} uses a builtin "var" variable. It starts with logger, the default name, in case the var variable finds no match. It is then followed by var(java.util.logging.Logger), what will evaluate to the name of the variable (member or local) of the specified type (in our case of the Logger type). Further, the ${cursor} variable marks the place where the cursor will jump after you press enter. So the result after expanding could be
 You might wonder what is the purpose of the if. It is there only for performance gain. If specified level is not allowed the logging method will never be called and we can spare JVM some string manipulation to build the message.
- readfile - read text from file
Never can remember how to open that pesky file and read from it? Nor can I, so I have a template for it.
BufferedReader in;
try {
in = new BufferedReader(new FileReader(${file_name}));
String str;
while ((str = in.readLine()) != null) {
${process}
}
} catch (IOException e) {
${handle}
} finally {
in.close();
}
${cursor}
Maven (Web and XML -> XML Files -> Templates)
- dependency - maven dependency
<dependency>
<groupId>${groupId}</groupId>
<artifactId>${artifactId}</artifactId>
<version>${version}</version>
</dependency>
${cursor}
- parent - maven parent project definition
<parent>
<artifactId>${artifactId}</artifactId>
<groupId>${groupId}</groupId>
<version>${version}</version>
<relativePath>{$path}/pom.xml</relativePath>
</parent>
${cursor}
web.xml (Web and XML -> XML Files -> Templates)
JSP pages (Web and XML -> JSP Files -> Templates)
- spring-text - spring text field with label and error
<label for="${path}" class="${label_class}"><fmt:message key="${path}"/></label>
<spring:input path="${path}" cssClass="${input_class}"/>
<spring:errors path="${path}"/> <br/>
${cursor} - spring-checkbox
<label for="${path}" class="${label_class}"><fmt:message key="${path}"/></label>
<spring:checkbox path="${path}" cssClass="${input_class}"/> <br/>
${cursor}
- spring-select
<label for="${path}" class="${label_class}"><fmt:message key="${path}"/></label>
<spring:select path="${path}" cssClass="${input_class}">
<spring:options items="${items}" itemLabel="${label}" itemValue="${value}"/>
</spring:select>
<spring:errors path="${path}"/> <br/>
${cursor}
- spring-generic
<label for="${path}" class="${label_class}"><fmt:message key="${path}"/></label>
<spring:${type} path="${path}" cssClass="${input_class}"/>
<spring:errors path="${path}"/> <br/>
${cursor}
These are my favorites. They regularly save me a huge amount of time. Creating spring forms has never been easier for me.
In some editor types you can set the template to 'new', for example, in XML editor it is
new XML. This is really useful, as you can prepare the skeleton of a new file. For example, this is what I use to create new Spring servlet configuration for freemarker application.
<?xml version="1.0" encoding="UTF-8"?>
<beans xmlns="http://www.springframework.org/schema/beans"
 xmlns:xsi="http://www.w3.org/2001/XMLSchema-instance"
 xmlns:context="http://www.springframework.org/schema/context"
 xsi:schemaLocation="http://www.springframework.org/schema/beans
     http://www.springframework.org/schema/beans/spring-beans-2.5.xsd
     http://www.springframework.org/schema/context
     http://www.springframework.org/schema/context/spring-context-2.5.xsd">

<context:component-scan base-package="" />

<bean id="freemarkerConfig" class="org.springframework.web.servlet.view.freemarker.FreeMarkerConfigurer">
<property name="templateLoaderPath" value="/"/>
</bean>

<bean id="viewResolver" class="org.springframework.web.servlet.view.freemarker.FreeMarkerViewResolver">
<property name="viewClass" value="org.springframework.web.servlet.view.freemarker.FreeMarkerView"/>
<property name="exposeSpringMacroHelpers"><value>true</value></property>
<property name="cache" value="true"/>
  <property name="prefix" value="/pages/"/>
  <property name="suffix" value=".ftl"/>
</bean>

<bean id="messageSource" class="org.springframework.context.support.ResourceBundleMessageSource">
  <property name="basename"><value>messages</value></property>
</bean>
</beans>
Now, I can create new XML file from template and it will be ready to use. Before I knew about templates, I used to copy this from an older project, or search for it in Spring documentation. Now I don't have to..
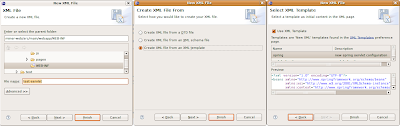
If you can overcome the initial laziness and create your own templates from the pieces of code you really use, than this investment will shortly return in form of less typing. If you have some interesting templates, please, share them with us.
You can
download the templates mentioned in this post and import them using the
Import button in the editor template settings.


 Posts
Posts

