September 16, 2008

Introduction to Association Rules Mining

Association rules are part of every data miner's arsenal. Haven't heard about it? I am pretty sure you've had. Association rules are a substantial part of every e-shop, of every supermarket and every tool that aims to analyze data.


Does the picture look familiar? If you've ever bought something at amazon, you might have noticed that they are kinda obsessed with showing you items related to your order. Where do they get this information? It is not stored statically in the database, instead it is computed from the overall orders using the association rules mining algorithms.

Do you think that items in your favorite supermarket are organized randomly? No, they are organized in a way that maximizes a chance that the items are bought. Again, this is information, that can be easily discovered using association rules mining algorithms.

From the previous paragraphs you might suspect, that association rules express relations (associations) between items. More formally, association rule is an implication of form A -> B, where the left side, A, is called premise and it represents a condition which must be true, for the right side, B (conclusion) to hold. A rule A->B can be interpreted as

If A happens, than B happens.
This is a very generic interpretation, because the true interpretation depends on the domain.I am now a supermarket employee and I got following rule from the mining software:

Bread -> Milk
The rule can be translated as:

Customers, who bought bread, also bought milk
Now I magically transform into a website traffic analyst and see a rule

/news/obama.html -> /sport/tour-de-france.html
and I instantly know that

those, who read news about Barrack Obama, also read news about le Tour and not only that, I know that those who are interested in Barrack Obama are interested in Tour de France.
Woosh, flash of light and I am now a doctor, looking at the rule

vasculitis -> paraneoplastic syndrome
and I see that there is a serious chance that my vasculitis patients will suffer paraneoplastic syndrome.

The important thing is, that association rules helped me to discover hidden knowledge (that's why they call it data mining), but the more important thing is, that I can act based on the knowledge. I can move the milk closer to bread to sell more of it together and generate more income. I can recommend stuff to my e-shop visitors, I can treat my vasculitis patients and run some tests to detect paraneoplastic syndrome early and maybe save lives.

So what do you need to get started? You need data of course, but not just any data, you need data in a form of transactions. These transactions have nothing to do with the database transactions. Instead, the transaction is a logical group of somehow related items. You might have groups of market basket items, groups of links clicked on one web page visit, group of one patient's diseases.. Such groups are then called transactions.

When I said, that rule interpretation depends on domain, it was only half of the truth. The other half is, that the interpretation also depends on your transactions. The interpretation simply depends on what you are mining, and what you are mining is based on how you define your transaction.

I'll now do a simple, manual association rule mining, using the classical market basket analysis example. We define our transaction as a content of a basket.

Transaction IdItems
1bread, milk, butter, cocoa, cheese
2bread, butter, milk, cheese
3bread, butter, olives
4milk, sugar, butter, cheese

We have four baskets, four customers and their data. Looking at the items, we see, that transactions 1,2,3 contain bread and butter. We have just found our very first rule.

bread -> butter
There are other rules in our data, for example rule

milk -> cheese
found in transactions 1,2,4. Although association rule mining may seem like a very trivial task at the first look, imagine finding the rules in dataset of billions of transactions.

The rules presented so far have all one big downside. There is no way to tell which rule is better, it is impossible to compare them. To get past this limitation, we can add several classifiers to the rule, which will represent the strength of the rule. They are commonly known as interestingness measures, because the strength of the rule is equal to its interestingness.

The two classical measures, which were introduced by R. Agrawal, an association rule pioneer, are called support and confidence. Support is a measure, which represents how often did the rule apply. It is a percentage of all transaction, where the items in the rule were found.

Confidence is a percentage of all transactions, which contain items on the left and on the right side of the rule.

IdTransactionsbread + cheesebread -> cheesecheese -> bread
1bread, cheese, honey, applesOOO
2milk, bread, cheese, pastaOOO
3milk, bread, apples
X
4bread, milk
X
5milk, pasta, cheese

X
6milk, bread, cheeseOOO

Look at the table above. Bread and cheese can be found in transactions 1,2,6, we have total six transactions, so the support of the rule bread -> cheese and cheese -> bread is 3/6 or 50%. Now take the rule bread -> cheese. Our customers bought bread in transactions 1,2,3,4,6, but bought cheese only in transactions 1,2 and 6. So five customers bought bread, but only three of them bought also a cheese, so the support of the rule is 3/5.


It should be pretty clear from the examples, that both interestingness measures are important, because they both quantify the rule and express its strength. But not only that, the interestingness measure are the key concept, that actually enables the mining.

Association rule mining is formally defined as a process of finding the rules, where the support and confidence of the rule are greater than the user provided values of minimum support and minimum confidence, further referred to as minconf and minsup. The two values actually prune the search space and make mining possible.

Take the last example. There is a rule milk -> apples [1/6, 1/1], which can be found in only one transaction. Is this rule interesting? It isn't and yet it is there. This is not a problem if we have six items in six transactions, but it would be great problem, had we thousands of items in billions of transactions. If you specify minsup=0.5, minconf=0.8 you will effectively filter out all uninteresting items. If you specify the values too low, you will end up with tons of rules, because the items will be associated with each other in all possible ways. On the other side, if you specify the values too high, you might not find a single rule. There is no universal advice as to what values should you set, the best way is to experiment.

What we'll be talking about next time? In the next posts I will show some practical examples using RapidMiner mining tool, explain the algorithm behind, tell about the problems this model has and explain why support and confidence are bad measures.


This is the first post in the Association Rule Mining series. Interested? Consider subscribing to my feed to catch up with updates.


July 3, 2008

HowTo: Automatically Backup Windows Machines to One Centralized Data Storage

I recently needed to set up an automatic backup for a few Windows workstations and few virtual machines running under VirtualBox. All data should be transferred to one standalone storage -- a RAID 0 Icybox disks.

Having read about rsync, the first idea was to set up rsync to do the backup. Rsync however requires an rsync daemon, or a unix shell on both synced machines. Although it is possible to run rsync on Windows using cygwin, there is no way to get rsync running on the Icybox.

Sidebar: What is rsync?

To clarify things a bit: rsync is a tools for remote synchronization of files. Feed it with two arguments -- the source folder and the destination folder and it will intelligently sync their contents. It will not blindly copy one folder over another, it will detect which files are outdated in the destination and will only copy these, saving your bandwidth and transfer time.

Working around the problem

I solved the problem with Icebox and Windows machines using a third, "man in the middle" server, which is actually running rsync and performing the backup between the mounted network shares.

The scheme is simple. Icybox is one big smb share, so I mount it on the "middle" server (/media/shares/users-backup). Each user is sharing all folders, that need to be backed up, and they are mounted too. I mount the user shares in one parent directory (/media/shares/users/username), which allows me to run rsync recursively on /media/shares/users, so the whole mounting machinery gets transparent for rsync.

Running the command rsync /media/shares/users /media/shares/users-backup will nicely backup all mounted shares to the remote disk. Note, that rsync is blissfully unaware of the fact that it is syncing two remote directories -- it thinks it is doing just a local copy. It also doesn't care what shares are mounted -- what is mounted at the time rsync runs is backed up.

The rsync command is added to cron and it is run each day at 1:00 am. All that is required from the users is to share their backup folders. The shares might be even protected with passwords (on both sides).

Show me teh code

To cook this delicious meal, we would need:

  • rsync
  • smbfs and/or cifs
  • cron

Step 1: Mount

The mounting needs to be done in /etc/fstab so it can be mounted at system startup and by executing mount -a command.

Open the /etc/fstab file and add one line for each of your shares:

//tomas/projects /media/shares/users/tomas/ smbfs ro,user,guest,nounix 0 0 
If your shares are standars Windows shares, or samba shares, use the smbfs option, if you are using nfs use cifs. Smbfs is unmantained and replaced by cifs, but unfortunately, cifs cannot resolve netbios hostnames. If your hosts are are using dhcp addresses, using hostnames instead of IPs is always a good idea.

It might happen that you will not be able to mount you share with smbfs. If this is the case, double check, that your share name does not end with a slash.Using //tomas/projects is ok, but using //tomas/projects/ will get you a nice "is not directory" error. If your share name is ok, but you are still unable to mount, try the cifs option.

Step 2: Write the rsync script

This is nothing complicated, just run rsync and log the times. As the first thing, we remount the shares, so if someone turned on or off the computer since the last mount, we get the current state.
#!/bin/bash
echo -e "\n===Rsync Start: `date` ===" >> /var/log/rsync-users.log

mount -a -o remount >> /var/log/rsync-users.log

rsync --verbose --stats --recursive --checksum --update --times/media/shares/users/ /media/shares/users-backup/ | tee -a/var/log/rsync.log

echo "===Rsync Stop: `date`===" >> /var/log/rsync-users.log
To ignore some files and directories, I use the --exclude-from option and pass it the file with each exclusion pattern on new line. The following sample is used in the script that backs up our vmware servers.
.*
*.vmem
*.WRITELOCK
*.log

Step 3: Add rsync to cron

Edit /etc/crontab and add following line:

1 0 * * *      backup    /home/backup/rsync-users
The second column specifies a user, which the script should run under.

That's it. The machinery starts at 1 am and all computers that are turned on are backed up. The backup is incremental so it usually takes only few minutes to resync.


June 25, 2008

Create new eclipse workspace -- with all your old settings

It's all a matter of taste. Do you like to have just one workspace for all your projects, or do you prefer to have multiple separate workspaces?

Sure, the first way seems to be the official, supported. It should be easy to manage the workspace -- given the tools like working sets (and working set filters), mylyn and the ability to close projects.

But I still don't get it.

I hate when my workspace is overflowing with projects, I want to have as many workspaces as projects.

So I create new workspace and live happily ever after.

But wait -- all my settings are gone. All my carefully crafted custom templates, all my keybindings, my font settings, everything is gone.

It's all text, fortunately


Lucky us. All eclipse settings are saved as a plain text in the workspace directory. So if you want to create new workspace, but preserve your settings, I have two answers for you:

The short answer

All settings are stored in the .metadata/.plugins/org.eclipse.core.runtime/.settings directory. I mean -- all relevant settings. If you look into .metadata/.plugins directory there are many more directories with settings, but they are too project specific. I've walked trough these configuration files one by one, believe me, nothing useful lies hidden there.

So the short answer is: If you want to create a new eclipse workspace and preserve all your settings, simply copy the .metadata/.plugins/org.eclipse.core.runtime/.settings directory into your new workspace directory.

The long answer

Let the code do the talk for me.
I have created a (simple) shell script that automates new workspace creation. The downside is that it requires either *nix or windows with cygwin. It has been tested by me, I and myself so it should work (most of the time).

To use it, save it somewhere, make it executable (chmod +x new-workspace.sh) and run it either in interactive mode
./new-workspace.sh -i
where it will ask you the details, or with paths to your workspaces (the new workspace directory will be created for you, just specify the path)
./new-workspace.sh old-workspace new-workspace.
If the script doesn't work for you, drop me a comment. Feel free to improve it (you may drop me a comment too).

Update: the pastebin page expired (although I'd swear I checked the keep forever option), so I moved the script over to github.


May 27, 2008

Making JavaDoc a bit more usable

First of all, I know people realized JavaDoc is a pain in the ass to use. I am also well aware of all those "let's make better JavaDoc" projects out there. Just for reference, there is

  1. Javadoc online, which is a simple JavaDoc search engine
  2. Docjar, with its tiny, unintuitive flash based JavaDoc browser, which takes ages to load
  3. Windows Help format JavaDoc
  4. Doctree -- directory of (all) JavaDoc sites
  5. Globaldocs, a JavaDoc browser
I am also well aware that each modern IDE can display JavaDoc, if you configure the proper URL first.

Call me old-fogyish, but I tried most of them and always ultimately returned to the (good?) ol' JavaDoc.


Fortunately, I found a way to cure JavaDoc's biggest wound -- it's inability to let me search for a class or a method. The cure is called Greasemonkey and JavaDoc Search Frame or JavaDoc Incremental Search script. How does it work? Install Greasemonkey and install the script. Point your browser on some JavaDoc site and enjoy the search.

Fortunately, it will work on (almost) all JavaDocs in the wild and requires no support from the JavaDoc creator. When the class html frame is loaded, Greasemonkey runs the script and the script automagically adds the search box.

JavaDoc Incremental Search


This is the older of the two scripts. It will display a search box above the class list and will filter out the classes as you type.


JavaDoc Search Frame


Based on the JavaDoc Incremental Search. This script completely removes the packages frame and spans the class frame vertically. It can search package names too and groups the results into packages, classes, interfaces etc.

Now, if only I could also search the methods..


February 28, 2008

Effective Eclipse V: Template mix

The same way I try to avoid the redundancy in my code, the same way I try to avoid the redundancy in my writing. I am lazy and templates do the most writing for me. Eclipse comes bundled with predefined templates, but they are too general and not all of them are too useful. The real power is in custom templates. In this article I would like to show you how to create them and list few useful pieces for inspiration.
What are templates


Exactly as the name suggests, templates are little pieces of code with defined placeholders. An example of simple template is
System.out.println(${text});
Each template has a name, which serves as a shortcut to the template itself. You type the name, press CTRL + SPACE and it will be expanded.

Our first template would expand to

I will not explain here what it all means, I already did this in my previous post on templates. What is important now, is that the ${text} placeholder (variable) was highlighted and can be edited immediately.
The true power of templates can be fully seen in more complex templates. The first power point lies in the fact, that you can have more than one variable with same name. Our second template will have more variables:
int ${increment} = ${value};
y = ${increment} + ${increment};
and will expand to
When you start typing now, all occurrences of increment variable will be changed. You can then switch to the next variable by pressing TAB key. In the end, you can have

in just three key presses - one for i, one for TAB and one for 2.

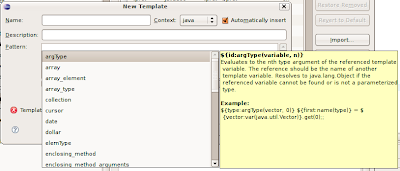
To make it even better, the template system provides predefined variables, which will be expanded depending on their context. I will not list them, you can find them under the Insert variable button.

Notice, that you are not getting only a list, you are also getting a description and an usage example.

To make it clear, I will illustrate one builtin variable - ${enclosing_type}. When this one is expanded you will get a name of the class (or interface, enum) in which your template was expanded.

"But how can I use it?", I hear you asking. I have prepared few templates just for inspiration, I believe that after reading this you will find thousands others and I believe that you will create them and share them with us.

Custom templates


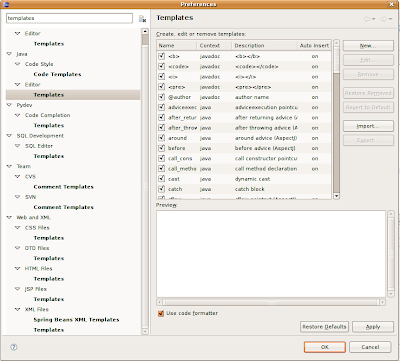
Open Window -> Preferences and type Templates into the search box.


You will get a list of all editors, and their respective template settings. This is because templates are closely bound to editors - you will get different builtin variables in different editors. Also note, that your list may vary from my list, it all depends on installed plugins.

Now you must decide what type of template you would like to create. If it is a Java template, which will be applicable in context of classes, interfaces and enums, then choose Java -> Editor -> Templates. If you create a Java template you won't be able to use it in XML editor, that's quite expected.

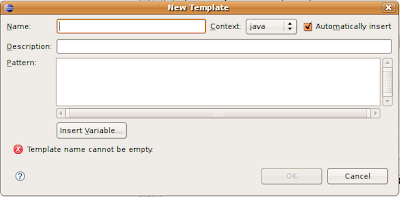
So click on the New button, to get a dialog. Here it is, in all its glory:

Name is the name of the template. Choose it well, because it will serve as a shortcut to your template. After you type the name of the template (or at least a few characters from its name) and hit CTRL+SPACE it will be expanded.

Description is what you will see next to the template name when the template name is ambiguous.

Pattern is the template body. And the Context? This varies in every editor. If you look in the combobox in Java templates, you will see Java and Javadoc. It is simple a context within the respective editor in which the template would be applicable.

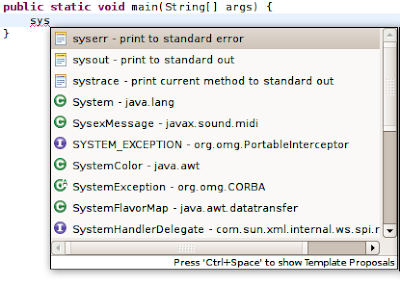
Check Automatically insert if you want the template to expand automatically on ctrl-space when there is no other matching template available. It is usually good idea to leave the checkbox checked, otherwise you would get a template proposal "popup". See what happens when I uncheck it on sysout template.

If I would have checked it, it would automatically expand, as there is no other template matching sysout* pattern.

My list


So here is the list I promised. I have categorized it.

Java (Java->Editor->Templates)
  • logger - create new Logger
    private static final Logger logger = Logger.getLogger(${enclosing_type}.class.getName());
    Notice the usage of ${enclosing_type} variable. This way you can create a logger in few hits. After the template expands, you will probably get red lines, indicating that Logger clas could not be found. Just hit CTRL + SHIFT + O to invoke the organize imports function. You are using shortcuts, aren't you?

  • loglevel - log with specified level
    if(${logger:var(java.util.logging.Logger)}.isLoggable(Level.${LEVEL})) {
    ${logger:var(java.util.logging.Logger)}.${level}(${});
    }
    ${cursor}
    Let me explain the details. ${logger:var(java.util.logging.Logger)} uses a builtin "var" variable. It starts with logger, the default name, in case the var variable finds no match. It is then followed by var(java.util.logging.Logger), what will evaluate to the name of the variable (member or local) of the specified type (in our case of the Logger type). Further, the ${cursor} variable marks the place where the cursor will jump after you press enter. So the result after expanding could be

    You might wonder what is the purpose of the if. It is there only for performance gain. If specified level is not allowed the logging method will never be called and we can spare JVM some string manipulation to build the message.

  • readfile - read text from file

    Never can remember how to open that pesky file and read from it? Nor can I, so I have a template for it.

    BufferedReader in;
    try {
    in = new BufferedReader(new FileReader(${file_name}));
    String str;
    while ((str = in.readLine()) != null) {
    ${process}
    }
    } catch (IOException e) {
    ${handle}
    } finally {
    in.close();
    }
    ${cursor}
Maven (Web and XML -> XML Files -> Templates)
  • dependency - maven dependency
    <dependency>
    <groupId>${groupId}</groupId>
    <artifactId>${artifactId}</artifactId>
    <version>${version}</version>
    </dependency>
    ${cursor}
  • parent - maven parent project definition
    <parent>
    <artifactId>${artifactId}</artifactId>
    <groupId>${groupId}</groupId>
    <version>${version}</version>
    <relativePath>{$path}/pom.xml</relativePath>
    </parent>
    ${cursor}
web.xml (Web and XML -> XML Files -> Templates)
  • servlet - new servlet definition
    <servlet>
    <servlet-name>${servlet_name}</servlet-name>
    <servlet-class>${servlet_class}</servlet-class>
    <load-on-startup>${0}</load-on-startup>
    </servlet>

    <servlet-mapping>
    <servlet-name>${servlet_name}</servlet-name>
    <url-pattern>*.html</url-pattern>
    </servlet-mapping>
    ${cursor}
JSP pages (Web and XML -> JSP Files -> Templates)
  • spring-text - spring text field with label and error
    <label for="${path}" class="${label_class}"><fmt:message key="${path}"/></label>
    <spring:input path="${path}" cssClass="${input_class}"/>
    <spring:errors path="${path}"/> <br/>
    ${cursor}
  • spring-checkbox
    <label for="${path}" class="${label_class}"><fmt:message key="${path}"/></label>
    <spring:checkbox path="${path}" cssClass="${input_class}"/> <br/>
    ${cursor}
  • spring-select
    <label for="${path}" class="${label_class}"><fmt:message key="${path}"/></label>
    <spring:select path="${path}" cssClass="${input_class}">
    <spring:options items="${items}" itemLabel="${label}" itemValue="${value}"/>
    </spring:select>
    <spring:errors path="${path}"/> <br/>
    ${cursor}
  • spring-generic
    <label for="${path}" class="${label_class}"><fmt:message key="${path}"/></label>
    <spring:${type} path="${path}" cssClass="${input_class}"/>
    <spring:errors path="${path}"/> <br/>
    ${cursor}
    These are my favorites. They regularly save me a huge amount of time. Creating spring forms has never been easier for me.
In some editor types you can set the template to 'new', for example, in XML editor it is new XML. This is really useful, as you can prepare the skeleton of a new file. For example, this is what I use to create new Spring servlet configuration for freemarker application.
<?xml version="1.0" encoding="UTF-8"?>
<beans xmlns="http://www.springframework.org/schema/beans"
xmlns:xsi="http://www.w3.org/2001/XMLSchema-instance"
xmlns:context="http://www.springframework.org/schema/context"
xsi:schemaLocation="http://www.springframework.org/schema/beans
http://www.springframework.org/schema/beans/spring-beans-2.5.xsd
http://www.springframework.org/schema/context
http://www.springframework.org/schema/context/spring-context-2.5.xsd">

<context:component-scan base-package="" />

<bean id="freemarkerConfig" class="org.springframework.web.servlet.view.freemarker.FreeMarkerConfigurer">
<property name="templateLoaderPath" value="/"/>
</bean>

<bean id="viewResolver" class="org.springframework.web.servlet.view.freemarker.FreeMarkerViewResolver">
<property name="viewClass" value="org.springframework.web.servlet.view.freemarker.FreeMarkerView"/>
<property name="exposeSpringMacroHelpers"><value>true</value></property>
<property name="cache" value="true"/>
<property name="prefix" value="/pages/"/>
<property name="suffix" value=".ftl"/>
</bean>

<bean id="messageSource" class="org.springframework.context.support.ResourceBundleMessageSource">
<property name="basename"><value>messages</value></property>
</bean>
</beans>
Now, I can create new XML file from template and it will be ready to use. Before I knew about templates, I used to copy this from an older project, or search for it in Spring documentation. Now I don't have to..

If you can overcome the initial laziness and create your own templates from the pieces of code you really use, than this investment will shortly return in form of less typing. If you have some interesting templates, please, share them with us.

You can download the templates mentioned in this post and import them using the Import button in the editor template settings.


February 15, 2008

And so I wasted my time: OC4J and EJB Syntax error in source

oracle.oc4j.admin.internal.DeployerException:
Error initializing ejb-module;
Exception Error in application ejb-module:
Error loading package at file:/opt/oracle/ejb.jar,
Error compiling /opt/oracle/ejb.jar:
Syntax error in source
This was all I got from OC4J as a response to my attempt to deploy application. Compilation went fine, so it had to be some error in generated wrapper code.

Google search yielded only three results, including one from oracle forums with unanswered question. So I begun removing last changes, line by line, to discover the source of the error. In the end, it turned to be a missing RemoteException in remote interface. Doing it remotely, without IDE and XDoclet I forgot to add this one.

So I am writing it now, hoping that your search yielded four results and that one of them - mine, just saved you an hour of precious time.


February 9, 2008

Add jQuery autocompletion to your Eclipse

It's easy with jQueryWTP. It is not an Eclipse plugin, it is a nice tool, which modifies some WTP plugin autocompletion definitions to make it support jQuery.

Installation is easy:

  • run the tool
  • find the plugin jar and patch it
The complete instructions with a video guide are available on the jqueryWTP homepage.

It works nicely, there is one gotcha however, which is not mentioned in the official instructions. You must choose the correct jar, the one, which is being used by WTP. It is possible to have multiple version of the same plugin jar - it is even anticipated if you update your plugins. So choose the correct version - it should be the most recent, with the highest version number. If you are unsure, try all of them, but don't forget to do a backup of the original plugin jar.

It can spare you few key strokes and eventually few trips to visualjquery.


February 3, 2008

Effective Eclipse IV: Fix it, quickly

You are in trouble. Red lines are everywhere. There is no easy way out, so you just either start googling what went wrong, or start a copy&pasting session. If it is so smart, it can tell me that I have an error in my code, why cannot it just fix it?

Well, let me introduce you a powerful ally: Quick Fix.

A small example

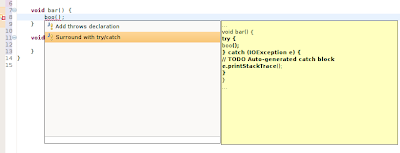
On the image above is a well-known situation. The method is throwing a checked exception, so the calling method must either enclose it in a try-catch block, or rethrow it. A typical solution to this problem is to manually write the try-catch block or throws clause. But there is a better way, the way of quick fix.

It can be invoked in two ways

  • clicking on the bulb, left of the line number
  • hitting CTRL + 1 - the preffered way
The result will be..

..that quick fix will propose you both fixes. In the yellow box is a preview, it looks messy, but the code will be properly formatted. If you don't like the generated code, you can change it under Window->Preferences->Java->Code Style->Code Templates. I don't like the default e.printStackTrace(), so I changed the Catch block body template to
logger.severe("Exception caught: " + ${exception_var});
Whenever a red line appears, quick fix can eliminate it. It is applicable not only to the situation above, it can fix:
  • Typos
  • Imports
  • Casting

    Starting with the simple casts...


    .. to even more intricate

  • and any other kind of problem I am unable to think up at the moment.
I found quick fix helpful even in the desperate situations like this one:


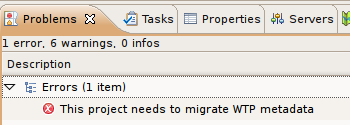
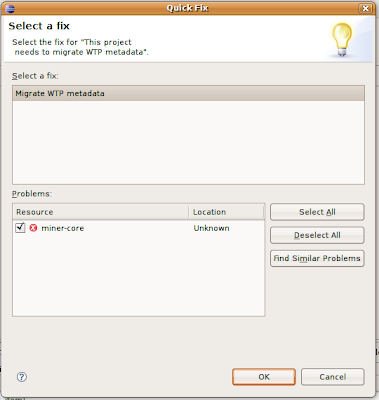
Project needs to migrate WTP metadata? Ok then, have your fun.


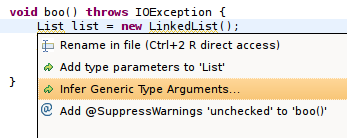
When there is nothing to fix, quick fix turns itself to a quick refactoring. Let's see what will it propose on our list.


See, it provides all sorts of context sensitive advices. Refactoring, renaming, annotations, everything is there, hidden under one shortcut key. A powerful shortcut key, definitely.


February 2, 2008

Improve your jQuery-fu, write plugins


jQuery is a simple, yet powerful JavaScript library, which really changed my point of view of JavaScript-ing. A new wave JavaScript they call it and it receives this title righteously. The code you create is a pure elegance.

You start with 10 lines of jQuery that would have been 20 lines of tedious DOM Javascript. By the time you are done it's down to two or three lines and it couldn't get any shorter unless it read your mind.

But of course it can get shorter. It can get shorter by refactoring your script into jQuery plugin.

When it comes to writing, plugins people (including me) usually back off in horror. I heard about jQuery plugins long ago, but never dared to write one. Somewhere in my mind crept a thought, that

  • It must be hard and thus left only to true masters
  • It must require a deep knowledge of jQuery
  • what could I possibly gain?
(I come from a Java world if you wonder).

None of the above is true. Writing jQuery plugin is as easy as writing jQuery script. It does not require any special knowledge. All that is needed, is to extend a jQuery object. Something like

$.fn.myPlugin = function() {
$this = $(this);
// plugin code
return $this;
}
Remember? This is JavaScript, not Java and the code above is the only thing needed to create a plugin. Inside the function, $this is reference to the jQuery object the plugin was called at.
$("table").myPlugin().addClass("surprise");
Now, $this is table and you can do all sorts of things with it. Because the plugin returns $this, jQuery operations can be chained.

By extending jQuery object, you do not only inherit its fields and methods, you inherit its elegance.

Now, back to my question, what could you possibly gain by creating a plugin? Mainly

  • Higher degree of reusability JavaScript scripts are generally reusable, but when you create a plugin you can move it up one level. It is similar to refactoring the common code into reusable classes.
  • Configurability This is related to the first point. The usual scenario without plugin is to have a snippet of code, then copy and paste it over to html and change the code to customize its behavior. It is much easier with plugin. You can write your plugin to accept some settings. This is how it could look:
    $(table).myPlugin({url: 'edit.htm', param: 'id'});
  • Elegance
  • The code above surely looks better than a whole script, doesn't it?


Now it's time to show some real life example. I have been using a script, to make each row of a table clickable.

$("table tr").click(function() {
location.href = 'edit.html?id=' + $("td:first a", $(this)).html();
});
Whenever I wanted to make the rows clickable I copied the snippet and changed the url or parameter name. But with the plugin..
$.fn.clickable = function(settings) {
defaults = {
href: 'edit.htm',
paramName: 'id'
}

settings = $.extend(defaults, settings); //overwrite the defaults with provided setings

$this = $(this);

$("tr", $this).click(function() {
location.href = settings.href + '?' + settings.paramName + '=' + $("td:first", $(this)).html();
});

return $this;
}
..I can use it:
$("table").clickable();
or when I am not confident with default settings, I can change them
$("table").clickable({href: 'change.htm'});

If you want to know more about plugins, read the official plugin authoring guide or Mike Alsup's excellent plugin development pattern.
I hope I inspired you.


January 10, 2008

Else is evil

What is the purpose of the else statement?
When you write if statement, you are expressing explicit condition, which the code following if will be executed under. You ensure that the code will run, only when the condition holds. What about else? By using the else, you are stating, that you don't mind the condition, potentially grouping multiple conditions under one statement. To illustrate the point, i will use the snippet of code

int deliveryType = order.getDeliveryType();

if(deliveryType == Delivery.NORMAL) {
orderQueue.placeOrder(order);
} else {
orderQueue.placePriorityOrder(order);
}

What's wrong with this code? Everything will work fine, unless there are only two types of order. The code explicitly handles normal order and then groups every other order and treats it the same. As soon as there is new order type added this code would break.

I believe that as the if expresses exactly one condition, the else too should express exactly one condition, or if this is not the case, then it should serve as a guardian. A guardian before the inevitable changes.

int deliveryType = order.getDeliveryType();

if(deliveryType == Delivery.NORMAL) {
orderQueue.placeOrder(order);
} else if(deliveryType == Delivery.EXPRESS) {
orderQueue.placePriorityOrder(order);
} else {
throw new RuntimeException("Unknown delivery type.");
}

The code above illustrates much better approach. The else serves here as a guardian. The application will work, and when there is new delivery type requested it will immediately break unit tests and signal the cause of problem.

if(order.isNew() == true) {
getOrderDao().save(order);
} else {
getOrderDao().update(order);
}

Using else here is appropriate too, as it represents exactly one condition. A boolean can never be anything else than true, or false. True or false, two conditions, two branches and there is no way for third.


January 6, 2008

I used to have a player


I used to have an mp3 player. It was an iPod Nano and it sucked. Everytime I wanted to push there some music, I had to go through extra slow and user-unfriendly iTunes. I don't have that player anymore, I threw it away.


I have a new player now. I can manage my music using a file browser. I can watch videos, play games (half-life, doom, gameboy color games). I can choose how it will look like and how it will behave. It is still the same old iPod Nano..
That little shiny magic, that converted my iPod into a box full of fun is RockBox


Rockbox is an open source firmware replacement for a growing number of digital audio players. It has been in development since 2001 and receives new features, tweaks and fixes every day to provide you with the best possible music listening experience. Rockbox aims to be considerably more functional and efficient than your device's stock firmware while remaining easy to use and customizable. We believe that you should never need to go through a series of menus for an action you perform frequently. We also believe that you should be able to configure almost anything about Rockbox you could want, pertaining to functionality. It is written by users, for users.


Features


So, what can you expect from it? Lot of things.

Although this post talks about iPod, RockBox runs on other players too, just check the official list

No more database


Rockbox is a file system based jukebox. Unlike iPod original firmware, it does not depend on any proprietary binary database. This means, that you no more need iTunes to access and manage your music. All you need is a file browser. With rockbox, iPod works just like any other USB device. You can organize your files whatever you like, they will be recognized by rockbox and ready to play. On figure 1, you can see a file tree view.


Fig. 1 File tree view


It behaves exactly like you'd expect, like a normal file browser. You can find your files there, and they will be handled with the correct plugin (eg. opening an jpeg image will activate the image viewer plugin, opening .mpg file will play the video).

Database


Well, I lied in the previous section. You can have your database if you want. Rockbox can be set, such that it scans your files when it starts. All audio files are processed and the database is created from the id3 tags. You can then view your music in a similar way like with the original firmware (figure 2).


Fig. 2 Database view


Wide range of music formats and audio settings


You can have your music encoded in one of the 15 audio codecs, including (mp3, ogg, wma, aac, wav and flac. see the full list). RockBox provides a graphical equalizer, with a presets and gaples playback.

Customizable screen themes


You can choose from a range of themes, or create your own. Figure 3 shows some themes I liked.


Fig. 3 Themes


Comprehensive settings


You can set almost everything. This might not mean much to you, but if you are like me, and you like to have control over your player, you will be pleased.

Movies


Yes, rockbox can play movies. But to make any use from it, you will need to reencode them in the mpeg2 format, and change the resolution. There are 3 examples on the plugin page, but only the one with mencode worked for me. Fortunately, all movies from pocketmovies.com worked well without encoding.
The plugin page further states:

mpegplayer does all video and audio decoding using your device's main CPU. It does not use any special video decoding hardware such as the Broadcom Video Processor found in the ipod Video. mpegplayer therefore performs very badly on such devices in comparison with the manufacturer's original firmware.


Games


This is the best feature of rockbox for me. It comes bundled with a dozen of simple games, like chess, snake, winmines, solitaire.. and doom. Rockbox actually provides a doom engine, to play the game, you need to get the game wads. The wads provide the game graphics and level definitions. You can find some wads on doomworld. I've even seen half-life and counterstrike wads.
Another possibility for a game-thirsty rockboxer is the gameboy emulator, with which you can play gameboy color games, like Super Mario.


Fig. 4 Freedoom


Applications and Demos


Quite useless for me, I don't need text editors, paint tools, nor do I like to watch fire demos, or rotating cubes. They are a simple demonstration of power of rockbox.

Image and text viewing


The same as with original firmware, except that you can place your images anywhere in the player, and you don't need to use iTunes.

Voice menus and multilingual support


Great for people with limited abilities, and for those, who don't speak English.

Last.Fm support


Even if your player does not support Last.Fm directly, with RockBox, you can get a log of your music activity. This log can be then sent to Last.Fm using one of the tools listed in RockBox wiki.

Downsides


The main disadvantage of all this is the battery life. iPod Nano is simply not prepared for a display backlight turned on for a long time, as is the case when playing videos, or games. According to my experience, batteries cannot take longer than one hour of playing, or watching videos. But this is not a blame of rockbox, but of the iPod's poor battery life. 8 hours of music playback with original firmware is not much I think. Rockbox can match the original firmware in this aspect, 8 hours of playback with a promise:


Right now Rockbox is in development. The software currently requires more power to run than the original firmware, and so the battery life is shorter. With time this will improve. On other platforms Rockbox has actually surpassed the retail firmware in battery life, though of course we can't promise that will happen with Rockbox until we see what the limits are, but it will definitely be better than it is now.


Another thing I noticed is no podcast support. Podcasts are treated as normal audio files. With the original firmware, I could resume the podcast where I stopped it, there is no such option in rockbox.

Installation


Installation was a breeze. Actually, and there's a bit of irony in this, rockbox installation was far more simpler than loading my iPod with music using iTunes.
All what is needed is to unpack the rockbox archive to player and run the boot loader patcher. Patching was very convenient, I just ran the patcher and it did its job well, without asking me for help. I didn't even had to specify the mount point, everything was autodetected.

Rockbox team provides a tool for automatic download, installation and patching called RockBoxUtility. Unfortunately it didn't work for me, but it might work for you.

Notice: Installing rockbox will not destroy your original firmware, nor will it delete your music collection. Original firmware will be still available.

After a week of using, I can say for myself, that I never want to see the original firmware again.

All images, except the fig. 3, were captured by myself, using the rockbox simulator - it is a nice utility which can run RockBox on a PC.